
PerfectContributionsView
GitHub 기여도 그래프를 iOS 앱에 그대로 재현하는 뷰 라이브러리
- Platform
- iOS 13+
- License
- MIT
- Package Managers
- SPM · CocoaPods · Carthage


Table of contents
Screenshots
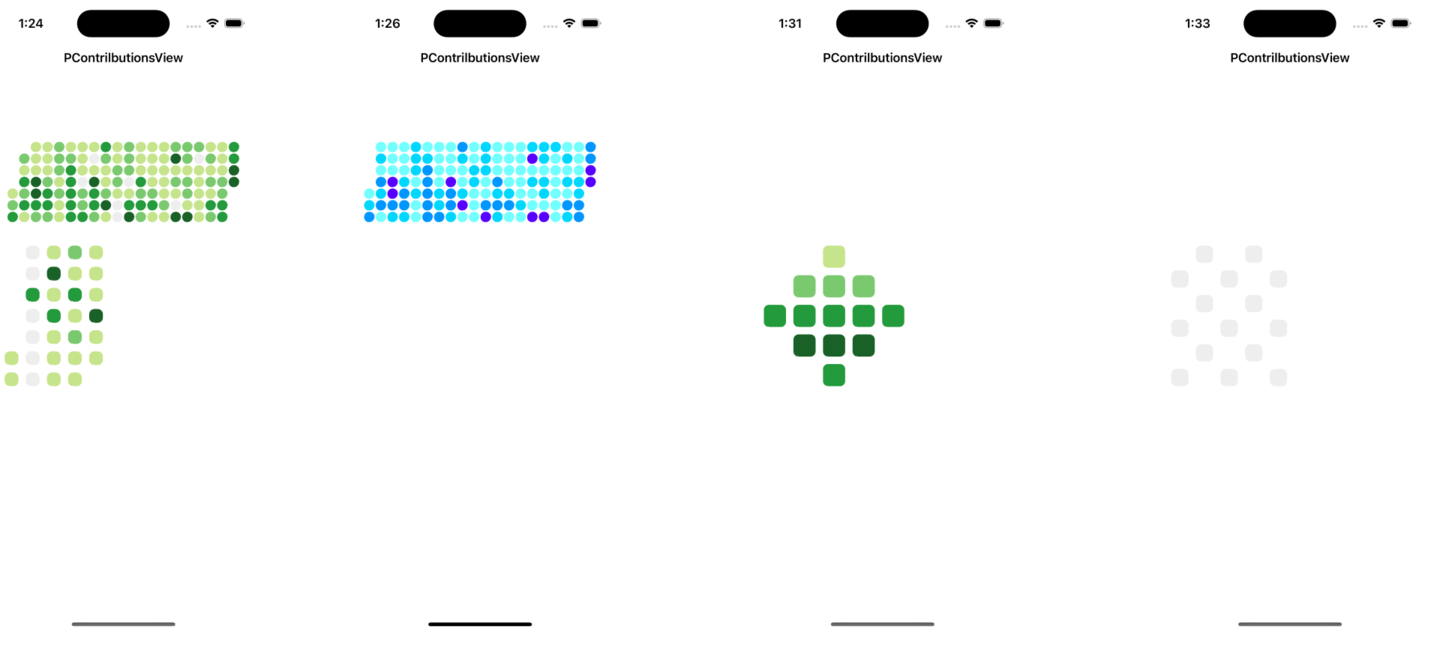
iPhone
Installation
저장소 이름은 PerfectContributionsView이고, 앱에서 추가하고 import하는 모듈 이름은PContributionsView입니다. 아래 예제는 2026년 11월 4일 확인한 패키지 설정과 구현을 기준으로 정리했습니다. Package.swift와 뷰 클래스 모두 iOS 13 이상을 기준으로 합니다.
SPM
- Xcode에서 UIKit 기반 iOS 앱을 만들고 Deployment Target을 iOS 13 이상으로 설정합니다.
- File → Add Package Dependencies에서 아래 저장소 주소를 입력합니다.
- Dependency Rule을 Branch의
main으로 선택하고,PContributionsView제품을 앱 타깃에 추가합니다.
https://github.com/jjunhaa0211/PerfectContributionsView같은 소스로 따라 하려면 Branch 대신 Commit에서1faa5a3facb5e26d12cba81882d525a99df202ed를 지정하세요. 이 패키지는 Swift tools 5.7.1 이상을 요구합니다.
CocoaPods
Podfile에 앱 타깃 이름을 넣고, 같은 폴더에서 pod install을 실행한 뒤 생성된 .xcworkspace를 엽니다.
platform :ios, '13.0'
use_frameworks!
target '<Your Target Name>' do
pod 'PContributionsView', '0.4.0'
endpodspec에 남아 있는 iOS 9 설정과 별개로, 현재 뷰 클래스의 사용 가능 버전은 iOS 13 이상입니다.
Carthage
기존 Carthage 프로젝트에서는 Cartfile에 아래 저장소를 추가합니다. 이 경로의 빌드는 별도로 실행 확인하지 않았습니다. 처음 따라 할 때는 위 SPM 예제부터 시작해주세요.
github "jjunhaa0211/PerfectContributionsView" "0.4.0"Setup
Use Interface Builder
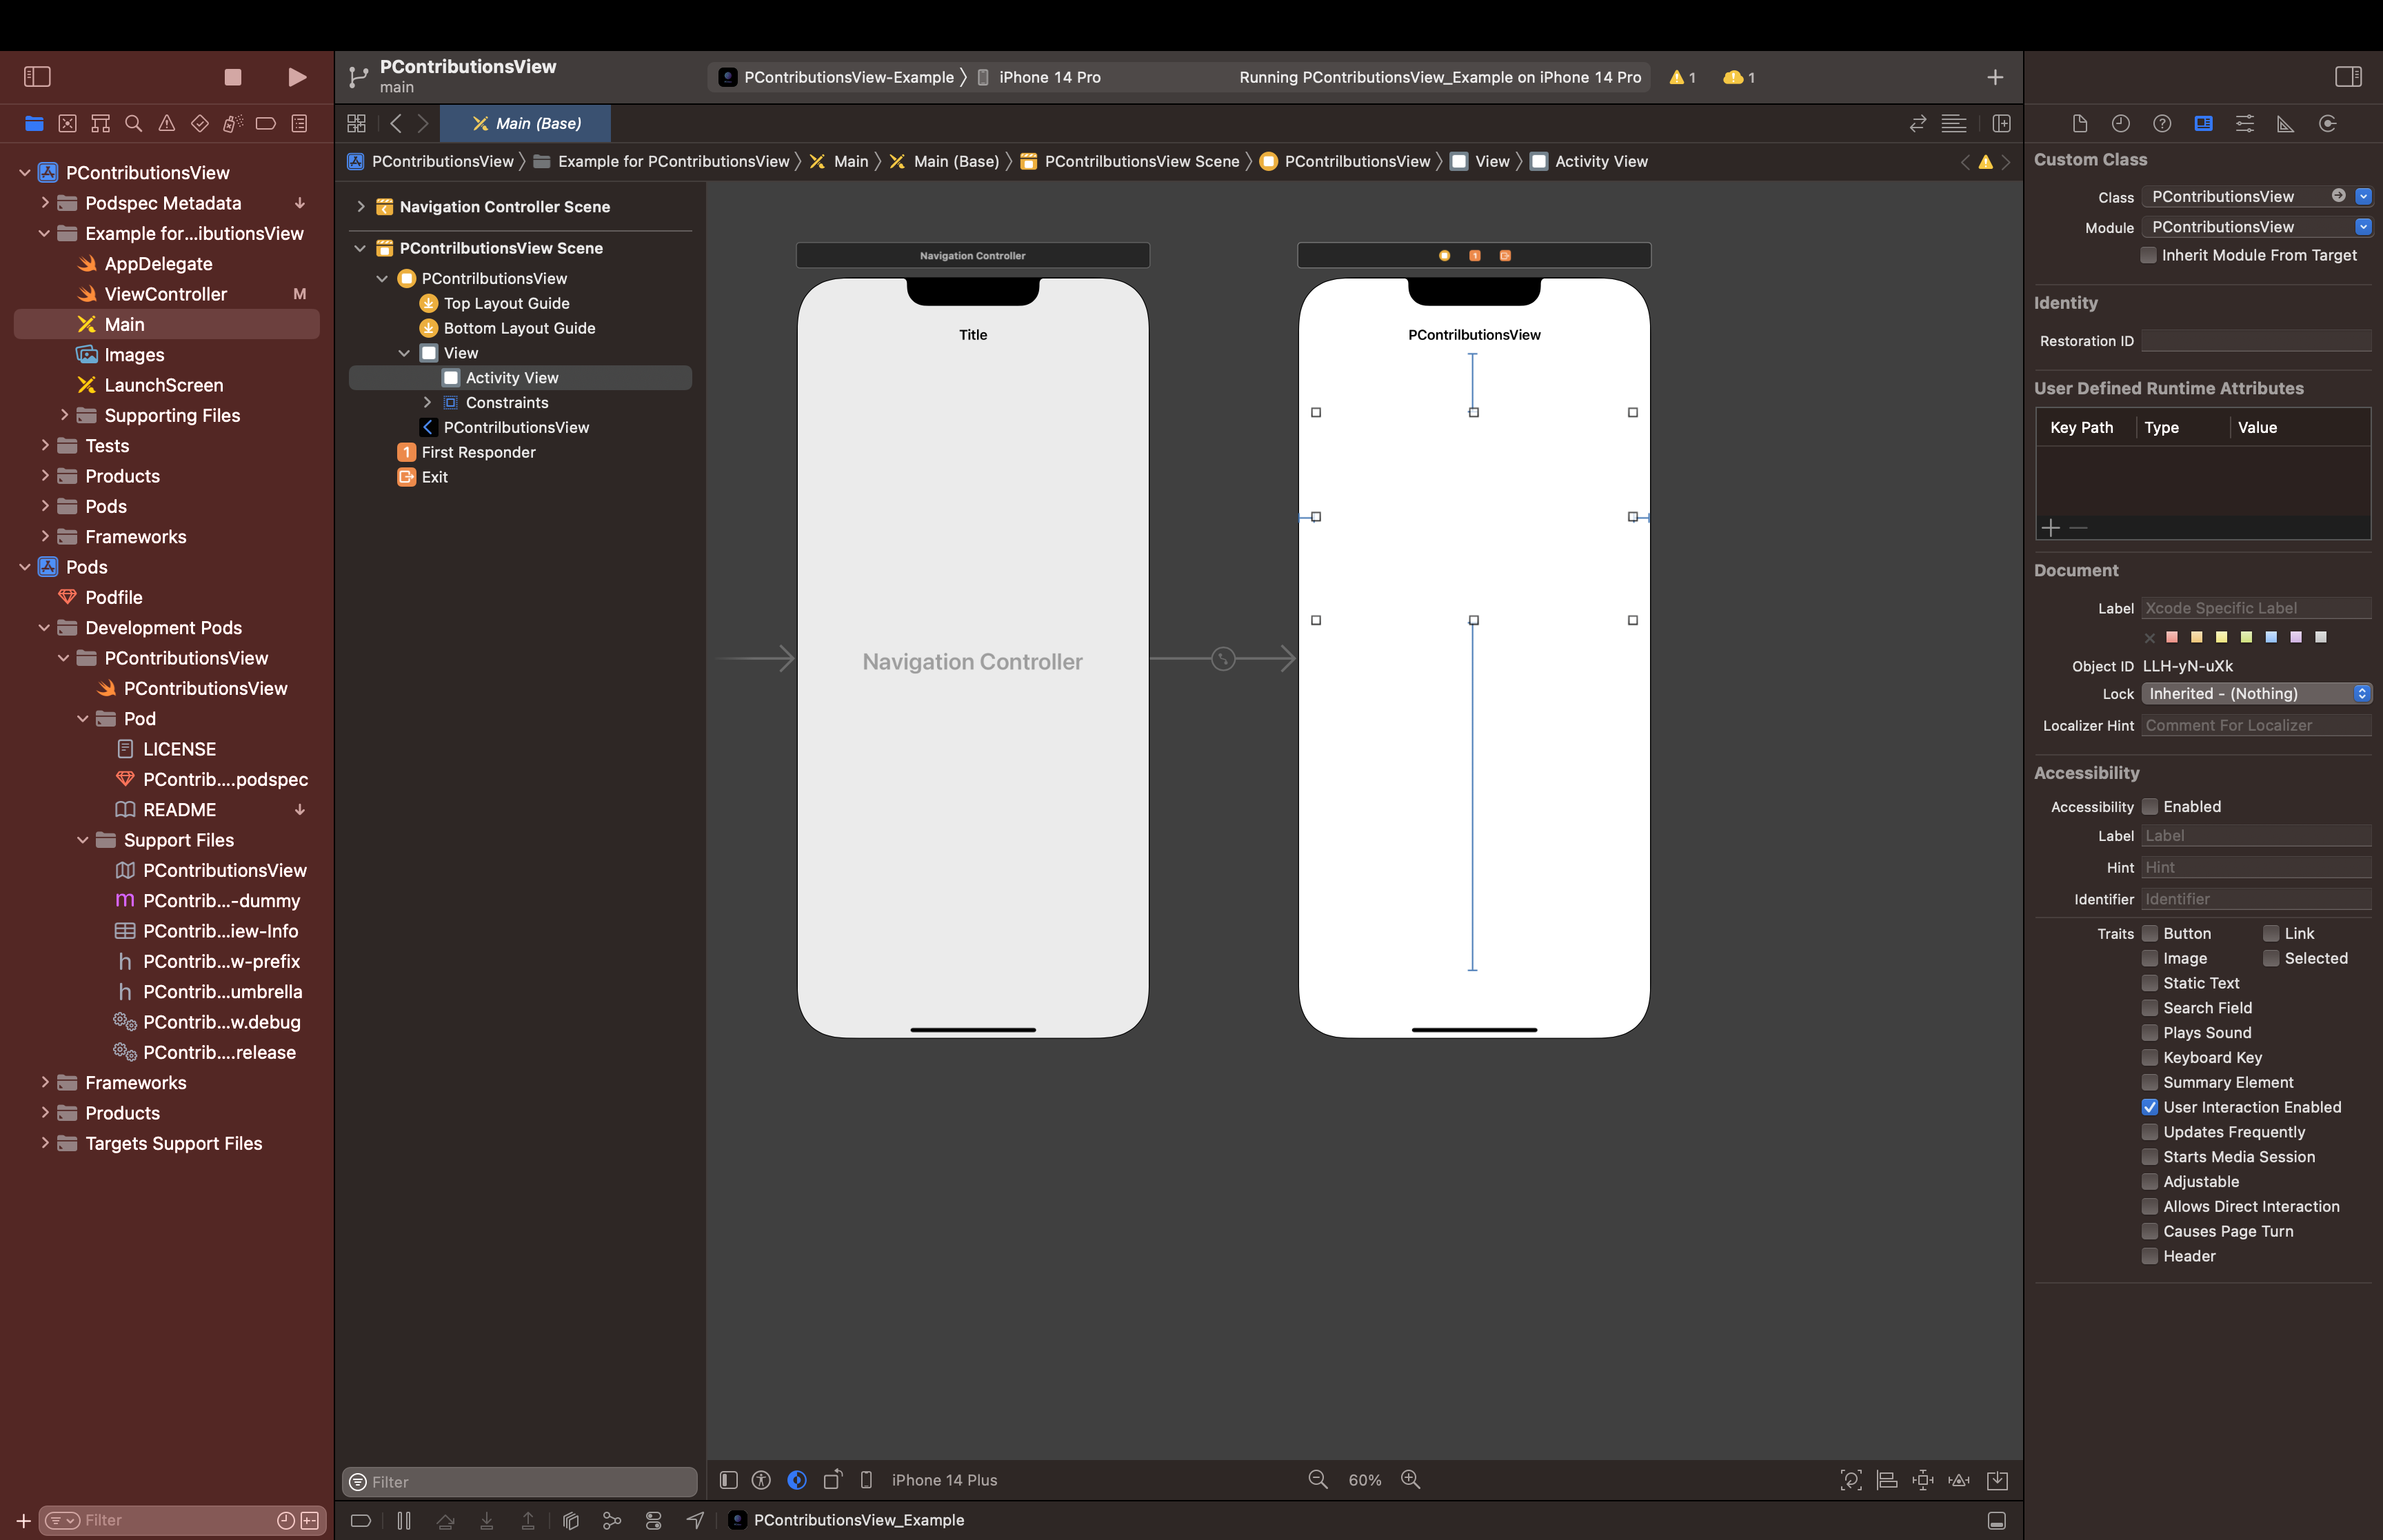
1. ViewController Scene에 UIView를 추가하고 너비와 높이 제약을 설정합니다.
2. Custom Class와 Module을 모두 PContributionsView로 설정합니다.
3. 뷰를 @IBOutlet weak var activityView: PContributionsView!로 연결한 뒤 viewDidLoad에서 데이터를 넣습니다.
Or swift
코드로 시작한다면 아래 ViewController를 앱의 첫 화면으로 연결해주세요. 실행하면 7행의 기여도 그래프가 보입니다.
import UIKit
import PContributionsView
final class ContributionsViewController: UIViewController {
private let activityView = PContributionsView(frame: .zero)
override func viewDidLoad() {
super.viewDidLoad()
view.backgroundColor = .systemBackground
let dataActivity: [[Int]] = [
[-1, 0, 1, 2, 3, 4, 0],
[0, 1, 2, 3, 4, 0, 1],
[1, 2, 3, 4, 0, 1, 2],
[2, 3, 4, 0, 1, 2, 3],
[3, 4, 0, 1, 2, 3, 4],
[4, 0, 1, 2, 3, 4, 0],
[0, 1, 2, 3, 4, 0, -1]
]
activityView.contrilbutionsData = dataActivity
activityView.translatesAutoresizingMaskIntoConstraints = false
view.addSubview(activityView)
NSLayoutConstraint.activate([
activityView.leadingAnchor.constraint(equalTo: view.safeAreaLayoutGuide.leadingAnchor, constant: 20),
activityView.trailingAnchor.constraint(equalTo: view.safeAreaLayoutGuide.trailingAnchor, constant: -20),
activityView.centerYAnchor.constraint(equalTo: view.centerYAnchor),
activityView.heightAnchor.constraint(equalToConstant: 220)
])
}
}Storyboard를 쓰는 앱에서는 첫 화면의 Custom Class를ContributionsViewController로 설정하고 Module을 앱 타깃으로 지정합니다. 코드로 윈도우를 만드는 앱에서는 이 컨트롤러를 rootViewController로 연결합니다.
contrilbutionsData는 현재 API에 실제로 있는 철자입니다. 빈 배열 대신 한 행 이상 데이터를 넣어주세요. 현재 구현은 행의 최댓값을 강제로 꺼내기 때문에[]를 그리면 오류가 발생할 수 있습니다.
Example
아래 설정은 위 예제의 viewDidLoad 안에서 activityView에 적용하면 됩니다. 이미 화면에 그린 뒤 데이터를 바꿀 때는 activityView.setNeedsDisplay()를 호출해주세요. 데이터와 색상 설정에는 자동으로 다시 그리는 처리가 들어 있지 않습니다.
Make Contributions Cell
// In Class
let dataActivity = [
[-1, 1, 1, 1, 2, 1, 1, 1, 3, 1, 2, 1, 1, 1, 2, 2, 2, 1, 1, 3],
[-1, 2, 1, 1, 2, 2, 1, 1, 2, 1, 2, 1, 1, 1, 4, 2, 1, 2, 1, 3],
[-1, 1, 1, 1, 2, 3, 1, 1, 1, 2, 2, 1, 1, 1, 1, 1, 1, 1, 1, 4],
[-1, 3, 4, 2, 1, 3, 1, 4, 1, 2, 1, 3, 1, 1, 2, 2, 1, 2, 2, 4],
[1, 2, 4, 3, 2, 3, 2, 3, 2, 1, 1, 2, 2, 1, 1, 2, 1, 1, 2],
[2, 3, 3, 3, 1, 3, 2, 3, 4, 1, 3, 3, 3, 2, 1, 1, 1, 3, 3],
[3, 1, 2, 2, 1, 3, 3, 2, 1, 1, 4, 2, 1, 1, 4, 4, 1, 2, 3]
]
// In loadView or viewDidLoad
activityView.contrilbutionsData = dataActivityChange Cell Color
// In loadView or viewDidLoad
activityView.userCustomColor(ColorMap("#F4F4F4", "#72FFFF", "#00D7FF", "#0096FF", "#5800FF"))default Color is githubContributionsColor
CellCornerRadius
// In Class
let dataSquare = [
[-1, 0, -1, 0, -1],
[0, -1, 0, -1, 0],
[-1, 0, -1, 0, -1],
[0, -1, 0, -1, 0],
[-1, 0, -1, 0, -1],
[0 ,-1 ,0, -1, 0]
]
// In loadView or viewDidLoad
activityView.contrilbutionsData = dataSquare
activityView.cellCornerRadius(10)기본 모양은 사각형입니다. 현재 구현은 모서리 값을 저장하지만 drawShape에서 사용하지 않아, 이 설정만으로 모서리가 둥글게 그려지지는 않습니다.
Color Level
// In Class
let dataSquare = [
[1, 2, -1, 4, -1],
[1, -1, 2, 1, 0],
[4, 2, -1, 0, -1],
[0, 4, 0, 2, 1],
[1, 0, -1, 0, -1],
[4 ,-1 ,0, -1, 1]
]
activityView.contrilbutionsData = dataSquare-1 : NULL
0 : very light
1 : little light
2 : neutral
3 : bit darker
4 : very dark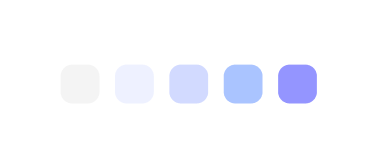
ContributionsCell Spacing
// In loadView or viewDidLoad
activityView.spacing = 5default Spacing is "2"
Change Shape
activityView.shapeType = .hexagon // .rectangle // .triangle // .pentagonlistBackground
// In viewDidLoad
activityView.listBackground(.green)
// activityView.backgroundColor = .green 과 같은 동작입니다.현재 구현은 해당 뷰의 backgroundColor를 설정합니다. 데이터 배열이 아니라 PContributionsView 인스턴스에 호출해주세요.
ColorMap
PerfectContributionsView Color supported
// In loadView or viewDidLoad
let colorMap = VioletColorMap()
let c0 = colorMap.getColor(0)
let c1 = colorMap.getColor(1)
let c2 = colorMap.getColor(2)
let c3 = colorMap.getColor(3)
let c4 = colorMap.getColor(4)
activityView.userCustomColor(ColorMap(c0, c1, c2, c3, c4))// Colors currently supported
let defaultColorMap = DefaultColorMap() // github green color
let violetColorMap = VioletColorMap() // Violet related colors
let shootingStarColorMap = ShootingStarColorMap() // shootingStar colorAuthor
- Github: jjunhaa0211
- Gmail: goodjunha@gmail.com
- Dm: jn_xhx
Realization
- The library still has many bugs. I will correct it little by little. If you find any bugs, please contact me. Advice is always welcome.
- 라이브러리에는 여전히 많은 버그가 있습니다. 조금씩 수정하겠습니다. 버그를 발견하면 저에게 연락하십시오. 조언은 언제나 환영합니다.
License
PContributionsView is available under the MIT license. See the LICENSE file for more info.
- 朴俊河
질문 & 답변
궁금한 점을 남겨주세요 — GitHub 로그인이 필요해요.